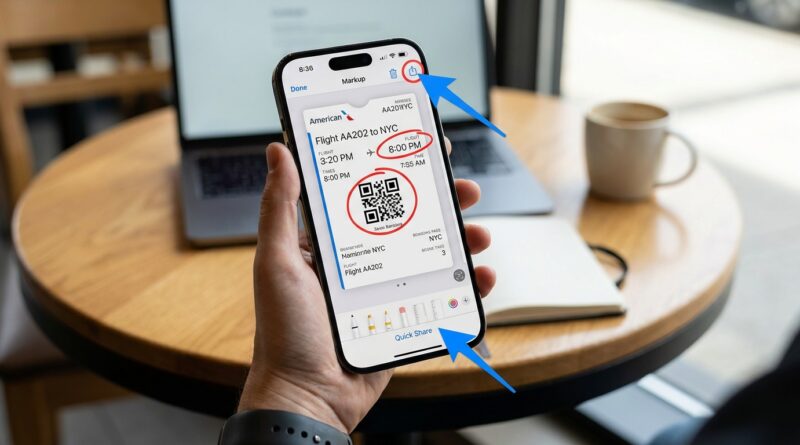
Stop Letting Screenshots Get Lost: The Hidden ‘Instant Markup + Auto‑Share’ Trick Power Users Use To Triage Info In 5 Seconds
You are not imagining it. Screenshots really do turn into digital sock drawers. One minute you grab a receipt, a tracking number, a text with an address, or a boarding pass. Two days later, it is buried under memes, pet photos, and 14 accidental lock screen captures. Then you are standing at a counter, scrolling like mad, wondering why something you “saved” is somehow impossible to find.
The fix is not taking fewer screenshots. It is changing what happens in the five seconds after you take one. Apple has quietly made that little screenshot preview in the corner much more useful than most people realize. If you tap it right away, mark the important part, share it to the right app or person, and then delete it, the screenshot never has to clog up your photo library. It becomes a quick stop, not permanent storage. Think of it like dealing with your mail over the trash can instead of dumping everything on the kitchen table.
⚡ In a Hurry? Key Takeaways
- Tap the screenshot thumbnail immediately, use Markup, then share or save it to the right place instead of leaving it in Photos.
- Crop first, circle the key detail, and send it straight to Notes, Messages, Files, or Reminders in one flow.
- This is faster and tidier, and it can also reduce the risk of leaving sensitive screenshots like codes and receipts sitting in your camera roll.
The hidden trick is simple
The real power move is this. Don’t just take the screenshot and move on.
As soon as you capture it, tap the little preview that appears in the bottom-left corner of your iPhone screen. That opens the screenshot editor, also called Markup. From there, you can crop, highlight, circle, add text, and most importantly, share it somewhere useful before it disappears into Photos.
This is why people searching for practical iphone screenshot markup tips are usually not looking for art tools. They want less clutter and fewer “where did I save that?” moments.
The 5-second triage method
Here is the workflow that makes screenshots feel organized instead of chaotic.
1. Take the screenshot
On most iPhones, press the Side button and Volume Up at the same time. A small preview pops up in the corner.
2. Tap the preview right away
If you ignore the preview, the screenshot gets saved to Photos by default. That is the black hole part. Tapping the preview gives you a chance to deal with it now.
3. Crop out the junk
Most screenshots contain extra stuff you do not need. Battery icon. Time. Random ads. Empty space. Drag the edges and keep only the important part.
This matters more than people think. A cropped screenshot is easier to read when you send it, and easier to use later if you do keep it.
4. Mark the key detail
Use the pen, highlighter, or shape tool to draw a circle around the tracking number, meeting time, gate number, or price. If needed, add a short text note like “Call this number” or “Use by Friday.”
You are turning a raw screenshot into something your future self can understand in one glance.
5. Tap Share
This is the part many people miss. You do not have to save the screenshot and then go hunt for it in Photos. Tap the Share button from inside Markup and send it straight where it belongs.
Good destinations include:
- Messages, if someone else needs it
- Notes, if it is reference info
- Reminders, if it is tied to a task
- Files, if it is something you may need later but do not want in Photos
- Mail, if you need to send a receipt or confirmation
6. Delete it if you do not need it in Photos
After sharing, tap Done. You will usually see options such as Save to Photos, Save to Files, or Delete Screenshot. If you already sent it where it belongs, choose Delete Screenshot.
That is the whole trick. Capture. Mark. Route. Clear.
When this works best
This method is perfect for the little scraps of information that pile up all day:
- QR codes for check-in
- One-time passwords or login codes
- Parking spot numbers
- Package tracking details
- Event tickets
- Recipes or shopping lists from a message
- Random “this is a good idea” moments
Instead of keeping all of that forever in Photos, you route each item to its proper home.
Best iPhone screenshot markup tips that actually help
Use shapes instead of messy scribbles
If you tap the plus icon in Markup, you can add a neat circle, arrow, or text box. This often looks clearer than hand-drawing a giant lopsided ring around something important.
Use opacity to avoid covering the info
If your highlight is too thick or dark, it can make the screenshot harder to read. A lighter pen or a simple arrow usually works better.
Zoom for precision
If the text is tiny, pinch to zoom while editing. It makes it much easier to crop tightly or point to the right line.
Save to Files for “important but not pretty” stuff
Photos is great for pictures. It is not great for utility items like forms, invoices, and account info. If a screenshot is more like a document than a memory, Files may be the better home.
Send to Notes when context matters
A screenshot of a flight confirmation is useful. A screenshot in a note called “Trip to Chicago” is much more useful. You can add a few lines under it and keep related info together.
What to do with full-page screenshots
On some screens, especially in Safari, Mail, or certain documents, you may see a “Full Page” option when editing the screenshot. This lets you capture the entire webpage or document, not just what is visible on screen.
That is handy for long receipts, instructions, or articles. But there is one important catch. Full-page screenshots usually save as a PDF, often to Files rather than Photos.
That is actually a good thing. It keeps long, document-style captures out of your camera roll.
Why this feels so much better than the old way
The old method is passive. You screenshot something, promise yourself you will sort it out later, and never do. Then every future search becomes slower.
The instant Markup and auto-share method is active. You make one tiny decision in the moment, while the information still makes sense. That cuts down on clutter and mental load.
It is a small habit, but it has the same effect as putting your keys in the same spot every day. Less friction. Less stress.
A few privacy and safety notes
Screenshots often contain more than the thing you meant to save. Maybe there is a phone number, account detail, location, or private message also visible. Cropping before sharing helps reduce accidental oversharing.
It is also smart not to leave sensitive screenshots sitting in Photos if you do not need them there. Verification codes, medical details, payment screens, and ID information are better deleted after use or stored more deliberately.
If the screenshot preview disappears too fast
No problem. If you miss the thumbnail, the screenshot is probably already in Photos. Open it there, tap Edit if needed, or use the share button to send it elsewhere. It is not as fast, but you can still recover.
Still, the magic is in catching that preview in the moment. Once it becomes muscle memory, it feels natural.
A simple starter routine
If you want to build the habit without overthinking it, try this rule:
- If it is for someone else, screenshot, mark it, send it, delete it.
- If it is for later reference, screenshot, crop it, save it to Notes or Files, delete it from Photos.
- If it is a true memory, save it to Photos.
That one rule clears up a surprising amount of mess.
At a Glance: Comparison
| Feature/Aspect | Details | Verdict |
|---|---|---|
| Save straight to Photos | Fast in the moment, but screenshots pile up and become hard to find later. | Fine for rare use, messy as a daily habit. |
| Instant Markup + Share | Lets you crop, highlight, send, and delete in one smooth flow. | Best option for receipts, codes, tickets, and quick reference info. |
| Save to Notes or Files | Keeps useful screenshots organized by topic instead of mixed with family photos. | Best for anything you may actually need again. |
Conclusion
You do not need a new app, a giant productivity system, or a weekend clean-up session to fix screenshot chaos. You just need a better default move. Right now everyone is drowning in tiny bits of on-screen information, from tracking numbers and QR codes to meeting details and one-off passwords. The good news is that iOS has quietly made screenshots much smarter. If you treat each one like a piece of incoming mail, grab it, mark the important part, route it where it belongs, and clear the rest, your phone starts feeling lighter almost immediately. It is one of those tiny habits that pays off every single day.